We created Clipdiary's page on Facebook. We'll be glad to see you in our friends there! Become Clipdiary's fan on Facebook now.
It would be great if you help us distribute Clipdiary and invite your friends to our page. Thank you! :)
Incremental search through clipboard history
In Clipdiary 3.1 incremental search appeared. In previous versions you should type a phrase to search into the search field, hit the "search" button and only after that searching started.
Now you don't need to hit that button to start the search process. Searching is automatically started after you type several characters into the search field.
Some options to set up the incremental search through the clipboard history are added in the next version of the program.
Open program options or press F4 and go to the Advanced tab. You can see Incremental search item there with the following settings:
We have also corrected a bug with searching non-latin characters in the new version of Clipdiary. The search was case-insensitive when searching by latin characters and case-sensitive with non-latin characters. We fixed this. Now search by national symbols is case-insensitive.
By the way, do you remember that you can use % as a wildcard character to substitute any other characters when searching through the clipboard history?
Now you don't need to hit that button to start the search process. Searching is automatically started after you type several characters into the search field.
Some options to set up the incremental search through the clipboard history are added in the next version of the program.
Open program options or press F4 and go to the Advanced tab. You can see Incremental search item there with the following settings:
- Start after - number of characters you should type before the search starts automaticaly.
- Delay - is the delay after you pressed a key on a keyboard and before Clipdiary starts to search. It is 200 ms by default.
We have also corrected a bug with searching non-latin characters in the new version of Clipdiary. The search was case-insensitive when searching by latin characters and case-sensitive with non-latin characters. We fixed this. Now search by national symbols is case-insensitive.
By the way, do you remember that you can use % as a wildcard character to substitute any other characters when searching through the clipboard history?
Highlighting of the used clipboard history
We are currently working on a new version of Clipdiary. It will be available on September, 1. There is already added feature to highlight strings that were inserted or copied.
Our users asked to add such option. In most cases when you paste a clip from clipboard history you most likely will paste it again and again. But you copy some new items and the clip you work with is moved up in the clipboard history list. So when you open Clipdiary to paste that clip again, you need some time to find it. Now the process of looking for the used clips is simpler: they are highlighted.
The highlight is removed when you switch to another page or restart Clipdiary. If you just hide and show Clipdiary, the highlight is not removed.
You can see a screenshot of the options below.
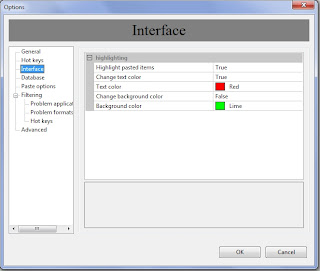
You can set up this feature in the Options of Clipdiary. Press F4 to show Options and go to the Interface tab. There you can switch off the highlighting or choose colors of the highlighted text and background.
Playing sound when copying data to the clipboard
Users often ask if Clipdiary can play sound when you copy something to the clipboard. This feature is not really important but we implemented it for you.
To enable playing sounds open File->Options->General tab and check "Play sound" checkbox. There you can choose the sound you like best from the list of 8 possible variants.
You can also add your own sounds if you want. Put them to the C:\Program Files\Clipdiary\sounds\ folder.
You will hear sound every time you copy something to the clipboard.
Portable clipboard manager
Do you know you can run Clipdiary from USB-drive without installation?
You can carry it with you on a flash-drive and always have your clipboard history at hand.
Download portable clipboard manager Clipdiary and get your clipboard history anywhere.
Just extract it to any folder where you want to store it and run clipdiary-portable.exe in order to launch Clipdiary.
You can carry it with you on a flash-drive and always have your clipboard history at hand.
Download portable clipboard manager Clipdiary and get your clipboard history anywhere.
Just extract it to any folder where you want to store it and run clipdiary-portable.exe in order to launch Clipdiary.
How to paste several clipboard history items together
You may often need to paste several clipboard history items together. The Clipdiary clipboard history viewer window is hidden after you copy or paste by default settings.
To keep the main window on the screen after copying or pasting you should go to the menu File and uncheck 'Hide after copying or pasting' option. You can also press Ctrl+F2 on the keyboard.
And do you remember that you can drag-and-drop clipboard history clips from the main window to the needed document?
Search through the clipboard history
How often do you search through the saved clipboard history?
Do you know that you can use % symbol in the search field as a wildcard character to substitute for any other character or characters in a string?
For example, you can type "john%.com" to find email addresses
johnsmith@hotmail.com
johnsmith123@yahoo.com
johnsmith@gmail.com
That is not frequently used feature, but sometimes it might be really helpful.
How to config tooltips behavior in Clipdiary
You can config some aspects of tooltips behavior at the File->Options->Advanced tab.
Automatically show full text of clip in tooltip. When you highlight clip in clipboard history viewer you see the tooltip with the full text of the clip. You can disable this function if you do not want to see tooltips every time you highlight clip. Remember, that you can always show/hide the tooltip using Arrow right and Arrow left keys.
Time to show tooltip. Now you can define time to show the tooltip by yourself. Time is set in milliseconds. Remember that 1 second = 1000 milliseconds. If you set this paraneter to 0, the tooltip won't be hidden automatically. You can also define time to show tooltip for quick copy.
Title for Quick Copy Tooltip. When using Quick Copy function you see a tooltip with text of the clip. Users often asked us to change the title of this tooltip or to remove it at all. We implemented this option and so you can config the title of this tooltip now.
Use own word wrap algorithm for tooltips. There is a bug in Windows 7 and Vista word-wrap algorithm. It works slowly and thus the tooltip is drawn slowly. We implemented our own algorythm for word wrap. It works fast, but there is a bug - it shows hyphenations not correctly. If this option is checked Clipdiary will use the own algorithm for the word wrap, otherwise - the system one.
Buy Clipdiary or Flashpaste today and save 50 percent off the regular price!
Softvoile is announcing a one-day special discount of 50 percent on two cool Windows applications that can greatly speed up your work.
Clipdiary - clipboard manager that keeps the complete history of everything that goes to the Windows clipboard, so that you can easily access any data you copied an hour ago or, say, last month.
Flashpaste - text snippet handler that lets you organize your frequently used text templates. Stop copy/pasting texts from many different sources — do your work more efficiently!
We would greatly appreciate if you recommend to your friends our windows clipboard manager Clipdiary. They can get a personal license for Clipdiary now, for only $10!
For more information visit http://clipdiary.com/discount.php
Clipdiary Advanced options
Starting with version 2.8 Advanced options in Clipdiary appeared. Now you can customize the program up to your own preferences.
Go to File->Options->Advanced tab and you'll see the following options.
Number of clips per page. When you open clipboard viewer window you see your clipboard history divided into pages. No you can easily choose number of clips to show per page.
Title length. Clipdiary creates a title for each clip. You see these titles in clipboard history viewer. You can edit titles of clips if you want. Now you can config the title length. You may choose more symbols if you need to see more text in the title. Changing this parameter won't effect the old clips, their title will remain unchaged. Only newer copied clips will have the length you've chosen.
Emulate Ctrl+V for pasting. Clipboard history clips sometimes are pasted incorrectly into some applications. If that often happens you can check this option and Clipdiary will emulate Ctrl+V key presses when pasting clips.
How to save clipboard data to file
Clipdiary saves the complete clipboard history for you. You can easily reuse any data you were copying while work with the computer: copy the data back to the clipboard or paste it directly to any application. But do you know, that you can save data to .txt file without opening of some text editor?
You may save to text file several clips together. Just select several clips in clipboard history viewer and follow the above instructions.
The feature may be useful when you collect some data from a web-page and need to put it to one file. For example, list of films you want to visit from large cinema schedule, or maybe several jokes from a big jokes collection to share with your friends later :)
- Pop-up Clipdiary
- Right-click the needed clip
- Choose Advanced->Save text to file from the context menu
You may save to text file several clips together. Just select several clips in clipboard history viewer and follow the above instructions.
The feature may be useful when you collect some data from a web-page and need to put it to one file. For example, list of films you want to visit from large cinema schedule, or maybe several jokes from a big jokes collection to share with your friends later :)
How to thumb through clipboard history pages
You can see the full clipboard history in Clipdiary clipboard history viewer. You see 50 latest clips. (By the way, do you remember how to config number of clipboard history items that are displayed per page?)
To see previous clips you should leaf over the page. There are two ways to do this:
To see previous clips you should leaf over the page. There are two ways to do this:
- With help of the mouse - click '<' or '>' button at the bottom of the page
- From the keyboard - press 'Alt+Arrow left' to go to the previous page or 'Alt+Arrow right' to go to the next page
Multiselection of clipboard history items
One Clipdiary's new features is multiselection. Users often asked how to delete more then one clip at a time, but there were no way to select several clips in the clipboard history viewer. Now you can easily do this. Hold Ctrl or Shift key and select the clips you need. If you need to select all clips at the page, press Ctrl+A.
Presently you can only delete selected items or export them to txt file. But multiselection opens opportunities to implement new features. For example, we will make an option to paste several clips simultaniously.
Remember, that you can simply clear the complete clipboard history on exit.
You are welcome to download new version of Clipdiary clipboard tool.
Where is clipboard history stored?
Clipdiary saves everything that you copy to the clipboard. The clipboard history is stored in one database file. To see the path to the file open menu File->Options and go to the Database tab.
If you need to store the clipboard history database in some other place, you may do the following:
The copied data is compressed before it is saved to the database. So even if you often copy large images, the database will still have a reasonable size. You do not have to worry that the saved clipboard history occupies much space on the disk.
If you do not want to save the clipboard history between sessions, see how to clear the clipboard history on exit
If you need to store the clipboard history database in some other place, you may do the following:
- Open the Database tab in the program options
- Click Clone and Switch and specify the path to the new location
The copied data is compressed before it is saved to the database. So even if you often copy large images, the database will still have a reasonable size. You do not have to worry that the saved clipboard history occupies much space on the disk.
If you do not want to save the clipboard history between sessions, see how to clear the clipboard history on exit
Подписаться на:
Сообщения (Atom)
